|
|

Yearly Deals |

|

|

|

|
|
Yearly Deals |
|
|
|

|
|
|
Yearly Deals |
|
|
|
|
|
Yearly Deals |
|
|
|
|
|
|
||
|
|
The yearly deals page is where you can see each rate plans Availability, Rates, Stop Sell, Min Nights and Inclusions for the next two years. This will provide you with a great way to see what's available for sale and what's not. You can also do Bulk Updates from this screen. To find out more on this go to Bulk Updates.
The Yearly Deals page also allows you to set individual rates or stop sells across particular distribution channels. An example of using this would be if you wanted to add a flaming deal on Wotif. To see the current overrides you have for certain channels, you can do so via the Channel Overrides Report. Please see below for more detailed information.
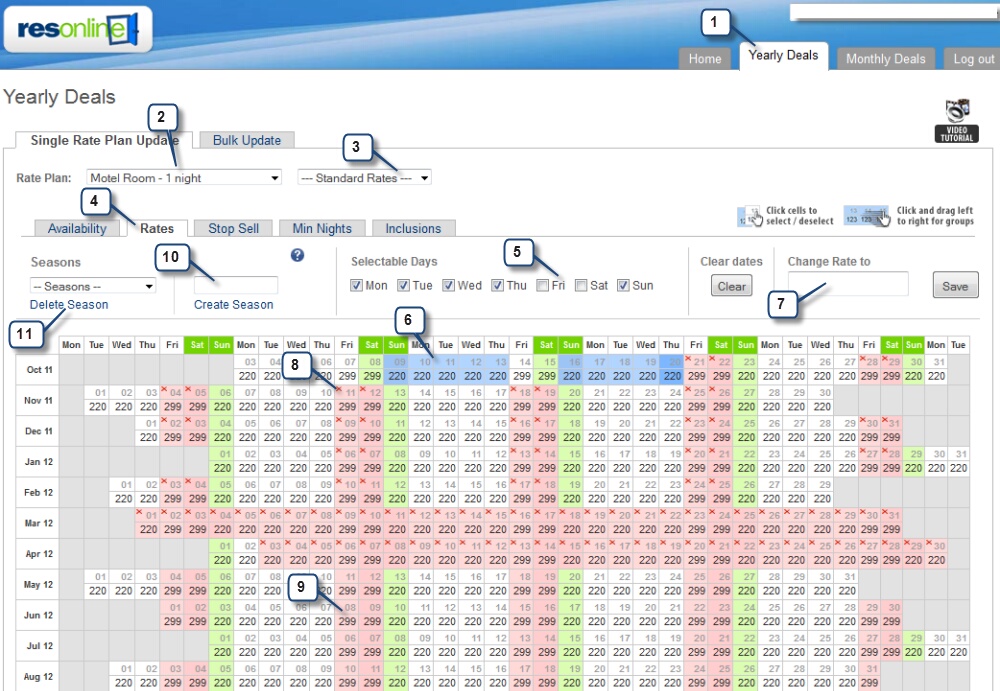
1.Click the "Yearly Deals" tab
2.Choose the rate plan you would like to view or amend.
3.You can choose to edit your standard rates which go to all distribution channels, or you can select a particular distribution channel to edit. Click here to view more information on updating individual distribution channels.
4.Once the rate plan loads, choose what you would like to edit. There are five tabs. You can use these tabs to switch between views, Availability will show you how many rooms are available instead of the rates as seen below, Stop Sell will show you the dates that are Stop Sold etc. This calendar will always default to open on the Availability view.
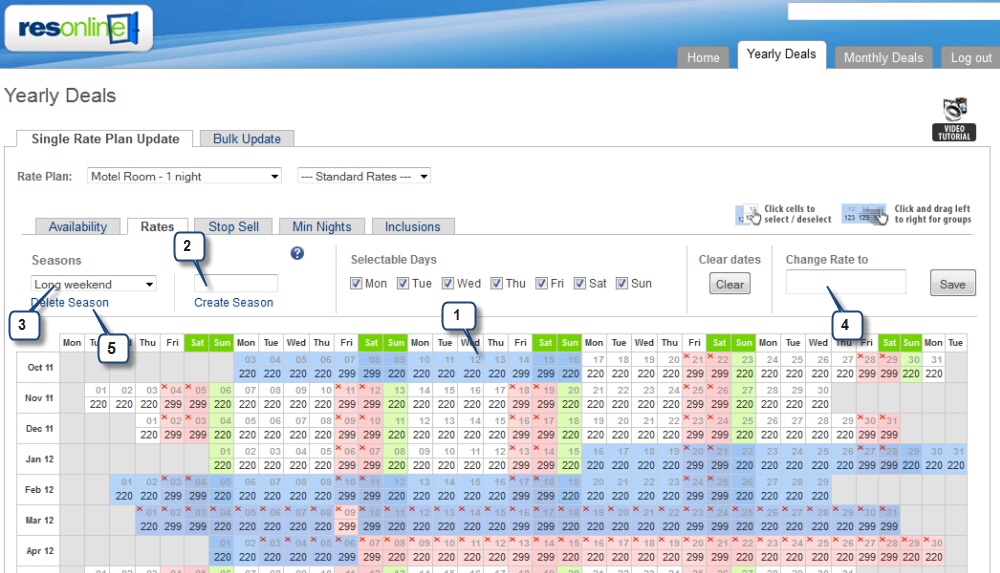
5.Choose which days of the week you would like to make changes for.
6.Using your mouse, select which dates you would like to change. You can click on individual dates, or alternatively you can click on the first date and whilst holding your left mouse button down, drag you mouse pointer to the last date you would like to change. If you make a mistake, click on "Clear Dates".
7.Once you have selected the dates to change, enter the new value and click on "Save"
8.On the calendar, you will notice some dates are pink with a red cross (Stop Sell) in the corner. This means that date is not for sale because they have a stop sell set.
9.You will also see other dates that are pink with no red cross. These again are not for sale due to no availability.
10.You can create seasons to assist you. Please see Creating Seasons below.
11.Once you have created a season you can choose it from the drop down list.
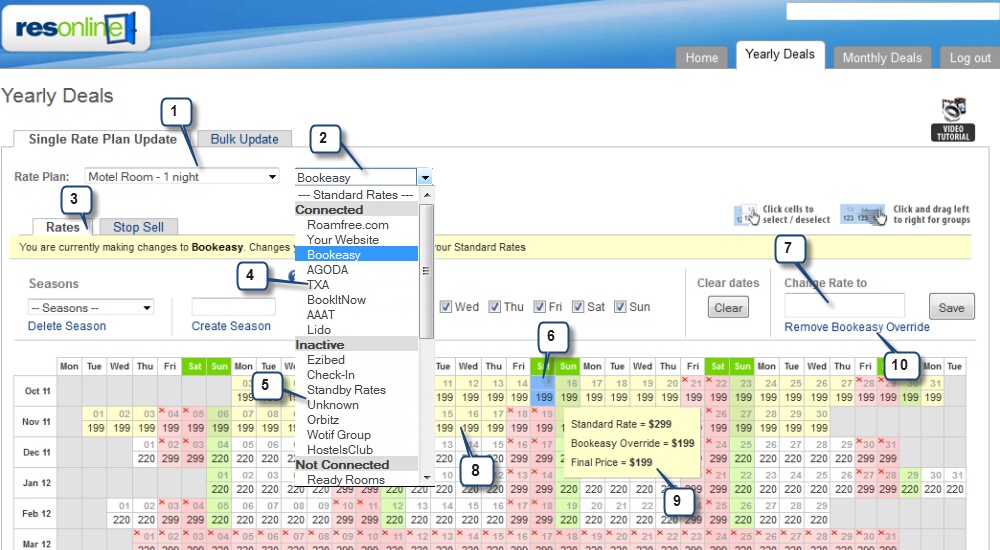
Overrides are a great feature of ResOnline that easily allows you to adjust rates or stop sells for a particular channel. An example of using these would be if you needed to add a special deal for a limited period of time to a specific distribution channel, such as a wotif flaming deal. You can also use them to stop sell particular distribution channels during the high seasons.
1.Under the "Yearly Deals" tab choose a rate plan you would like to change
2.Choose the distribution channel you would like to update
3.For individual distribution channels you can only update the Rates and Stop Sells
4.You will notice that the drop down list shows you distribution channels you have connected and active
5.And distribution channel that are either Inactive or not connected
6.Choose the dates you would like to update
7.And enter the value and "Save"
8.You will now notice that any overrides are highlighted in yellow.
9.If you hover over a date for longer than 1 second, a pop up will appear showing you how the current rate is calculated.
10.If you wish to remove overrides, first select the dates you would like to clear using your mouse, and then click on the "Remover Override" link.
Seasons will assist you in quickly updating particular times of the year such as long weekends, high seasons etc. It will also minimise the possibility of you selecting an incorrect date.
1.To create a season, first highlight the particular dates. These could be all the long weekends, or all your high season periods
2.Once you have highlighted the dates enter a name for the season and click on the "Create Season" link
Important - We highly recommend to clear selection on your Calendar before you create another season.
3.The season will now be created and available for future use. You should now be able to see the season in the drop down list. When you select it the dates on the calendar for this season will highlight.
4.All you need to do now is add the new value and click Save.
5.To Delete a season click on the "Delete Season" link.